Functions
main
Loading Clips
Layering/Polyphony
Multiple Windows
Luma Key
Opacity
Placement & Realtime Flying of Clips
Main Interface
Thumbnails Window
AVI info Window
Options Window
MIDI Controls
Load Multiple Clips
Sync Mode
Patch Loader
Recording & Rendering of MIDI Sequences
System Requirements
keystrokes
MIDI
freeframe
| Loading Clips |
|
Click on the black thumbnail slots in the Thumbnail window to load clips
(keystroke Alt+ |
| Layering/Polyphony |
|
VJamm 2 is fully polyphonic - you can have the sound & video from up to all 16 avis playing out at once like a hardware MIDI audio sampler. The performance that you get when playing lots of video & audio at once will depend on the hardcoreness of your PC setup. Generally speaking if you are thinking of getting into major polyphony, start by using quarter screen cinepaks. You should find that using 44Khz 16 bit sound is OK whatever - assuming that your sound card can do direct x hardware mixing. In the default mode AVI's layer with Q at the bottom & K at the top. In Triggered to Front mode, AVI's are brought to the front of the visual layer pile when they are triggered. Clips can be placed around the screen at any size & aspect ratio. |
| Multiple Windows |
|
VJamm 2 has a number of different windows which you can place about your monitor(s). The display window can be fullscreened with the TAB key, you can drag it to your second monitor if you have one, or use the display window on your main monitor (often gives better performance) & the other windows dragged to your second monitor. With one monitor, you can fullscreen the display area & use the F12 and F11 keys to bring up the Main Window & the Thumbnails window over it when you need them. Likewise the AVI info widow etc. On some grafix card drivers you need to be careful not to drag any of VJamm's other windows over the output area, as this can cause crashes - update your grafix card drivers if you are having problems like this. The Omega drivers can be good too for ATI cards. |
| Luma Key |
|
Each clip can have a Luma Key Level (these save in the .vjp). Each clip can
be either in normal or inverse luma key mode - this is set in the properties
window for each clip (the AVI Info window). To bring up the AVI Info window
for a clip you can either press Ctrl + The second slider in the LumaKey box is the Luma Blend slider. This controls the RealTime 8bit luma blend system to give a realistic / smooth luma key with an alpha gradient around the chosen luma cutoff level. When this slider is at the far left, you have the hard edged 1bit luma like in older versions of VJamm. With the slider near the left you get a smooth luma key. With the slider further to the right, you get a shallow luma blend slope and interesting effects. |
| Opacity |
|
Each clip can also have an opacity level. The Opacity slider on main program window controls the transparency level of the last clip triggered. VJamm realtime opacity now operates at full speed on all clips at once on modern grafix cards using hardware OpenGL acceleration. See the MIDI tab for info on realtime MIDI control of Opacity. |
| Placement & Realtime Flying of Clips |
|
Clips can be placed around the video output area by dragging them with the mouse directly on the screen. In the clip properties window you can enter precise pixel alignments - the coordinates are from an origin at the top left. See MIDI for details of flying clips in real time via midi data - you can control the position & aspect ratio of each clip in real time. Real time MIDI Positioning of clips is done with a Korg Kaoss pad, or other MIDI XY controller - see MIDI for details. |
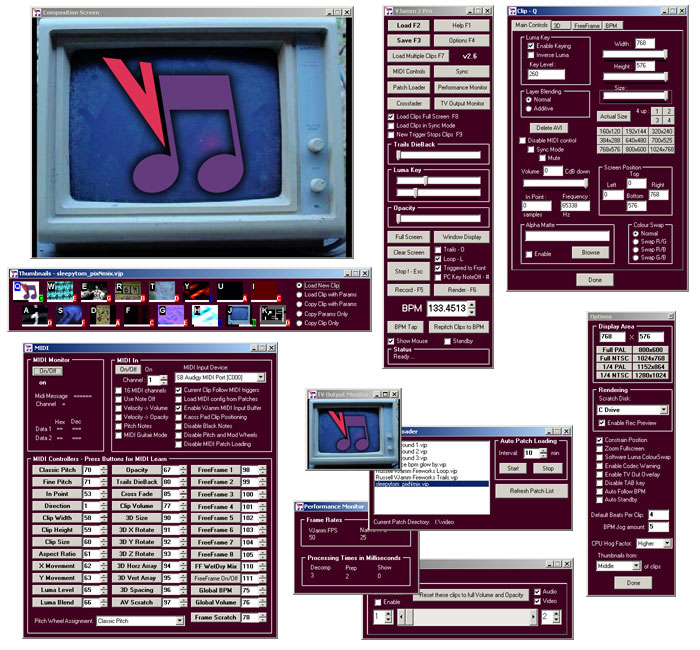
| Main Interface |
|
Load F2 - Load a VJamm Patch File (.vjp) - these save all VJamm settings, and the filenames of all the clips you are using - keystroke Function Key 2 Save F3 - Save a VJamm Patch File (.vjp) Help - Launches this Help window Options - Launches the VJamm global Options window Load Multiple Clips - Select a number of clips at once to load rather than loading them one by one. MIDI Controls - Launches the VJamm MIDI controls window Sync Button - use this button to resync Sync mode avis. Patch Loader - Launches the VJamm Patch window for loading patches quickly from the current patch directory and auto patch loading. Performance Monitor - monitor VJamm framerates, frame decompression times etc. Crossfader - The VJamm AudioVisual assignable crossfader. TV Output Monitor - Open the TV out window to get 'overlay' output from your grafix card / laptop. If your system dosen't support overlay you can also use this window as a full output preview with the overlay switched off in the options window. This works for multi-screen output areas too. Load Cips Full Screen - All clips load sized to the full current display area with this option on. Load Clips in Sync Mode - All clips are loaded in Sync Mode with this option on. New Trigger Stops Clips - One AVI at a time option - Like in VJamm1/VJPro Trails DieBack Slider - Controls the dieback level of Trails. For this to work you need the Trails checkbox below switched on. Luma Key Sliders - Adjust the Luma Key Level and Luma Blend Level of the current clip. The current clip can be identified by it's blue QWERTY clip letter in the thumbnail bank. Opacity Slider - Adjusts the opacity (transparency) level of the current clip. Trails - Leave trails when clips are moved & sized & triggered. Some good video feedback style effects can be got with this. Keyboard shortcut O Loop - Global clip looping. Keyboard shortcut L Triggered to Front - Bring clips to the front when they are triggered (see above) Keyboard shortcut ; Auto Standby - when this is switched on, VJamm automatically goes into standby when you click away from it (or Alt+TAB) to free up resources for other applications. BPM - use the BPM entry box to get VJamm to repitch your clips to a specific BPM eg. to get them in time with music. The Tap button lets you tap in a BPM if you don't know exactly what BPM it is you need, eg. VJing to a DJ that's not gonna tell you the BPMs. Repitch Clips to BPM repitches all the clips that you have set to Follow BPM in the AVIinfo window. You can jog VJamm faster and slower like a turntable of CDJ with the = (+) and - buttons. See also the Auto Follow BPM check box in the Options window. Show Mouse - Whether the mouse pointer shows over the display area. You can still move the current clip about even when show mouse is swithched off. With show mouse on you can drag any clip that is playing about. Put loop on to keep clips playing while you postion them. Standby - Check this box to put VJamm to sleep. This frees up system resources to let you use other programs on your computer eg. windoze explorer. |
| Thumbnails Window |
|
The Thumbnails window contains the clip slots that you can click on to load clips into VJamm. When you have loaded clips you will see their thumbnails here. Black and white progress indicators under the clip thumbnails show you where clips have got to as they play. VJamm tries to load AVI clips on the faster, more VJable VFW system - most AVIs under 1 gig should load OK on this system giving you much better performance. Otherwise clips are loaded on the DirectShow system - you can hover the mouse over the clipslots to see which system your clips are loading on - try to make AVIs that will load on the VFW for scratching, going backwards etc. Select one of the copy options to drag & drop clips and/or their properties around the thumbnails. Put the options radio buttons back to Load New Clip to get back to loading clips by clicking on the clipslots. Right click on thumbnails to modify clip properties - this brings up the AVI info window: |
| AVI info Window |
|
Right click on a playing clip in Show Mouse mode to bring up the AVI info window for a particular clip. Keyboard shortcut - Ctrl + Clip Letter
Alpha Matte - Here you can load an 8 bit grayscale bitmap onto your clip to give a static stencil or alpha matte. Black parts of the bitmap will translate into fully transparent when your clip plays, white parts will be fully visible (opaque). the gray scales inbetween allow you to do transparency washes, or interpolation on shapes. Right click on an AVI in the display area whilst AVI info window is open selects a new clip. 3D Tab - This tab gives access to OpenGL RealTime 3D functionality. Switch on the Enable BillBoard checkbox to make these sliders work. So long as your clip is bigger than 256x256 it can be flown around in 3D in large arrays. Try using opacity / luma and dieback trails. FreeFrame Tab - FreeFrame is the plugin format that VJamm uses for realtime video effects. See the FreeFrame Page for details. BPM Tab - The BPM functions in VJamm allow you to automatically repitch clips to a particular BPM. To use this function, enter the number of beats that your clip is long, check the follow BPM box, and also check the auto follow BPM box in the Options window. When Auto Follow BPM is on, clips are imported with Follow BPM checked automatically, and they automatically follow changes you make to the VJamm global BPM. The BPM tab also contains other useful info about your clip - the calculated BPM, audio length, sample rate, no. video frames, FPS, and the number of frames per beat. |
| Options Window |
|
PC Keyboard PC keyboard Note Off - note off for the qwerty keyboard. You will probably want to turn your autorepeat right down for this. Trigger Volume - volume that the Qwerty keys trigger at (like velocity on MIDI) Display Area Numerical Size boxes - set the exact size of the output area that your clips will move in. For rendering this defines the size your avi will be rendered to. Presets - Presets for full screen and quarter screen PAL & NTSC, 800x600 & 1024x768 Larger sizes are also possible - just dial it in including multi desktop eg. 2048x768. Rendering Choose a scratch disk on which VJamm Pro puts its temporary files. Check the box to see a preview whilst recording. Render performance can be better with preview off. Constrain Position - Keep clips completely inside the display area. With this off you can have clips hanging over the edge of the display area, and MIDI movement of clips goes from right off one side to right off the other. Zoom Fullscreen - With this option on, VJamm zooms your display area up to the size of your desktop. With it off, your VJamming is displayed at actual output area size in the center of the screen. Software Luma ColourSwap - this option drops part of the LumaKey operation out into software. This option gets round an ATI card/driver bug that we saw on one of our test machines, where the luma was colourswapped (Red-Blue) in 16bit grafix card operation. Enable Codec Warning - Whether the warning message is shown when you do mixed codec patches. Disable TAB key - disable TAB to/from fullscreen for gigs Auto Follow BPM - The central control for the VJamm BPM control. Switch this on if you want to tell VJamm how many beats each clip is long in the AVIinfo window, and let VJamm repitch all your clips to the VJamm Global BPM on the VJamm main window. Default Beats Per Clip - The default number of beats per clip that clips will be set to when they are loaded with the Auto Follow BPM checkbox ticked. BPM Jog Amount - the BPM that will be added / subtracted from the current BPM when you press the Jog buttons (- and = (+) ) CPU Hog factor - With this option you can turn down a bit the extent to which VJamm hogs all your computer's system resources. Use the standby check box on the front interfact to put the program to sleep while you do other stuff on your machine. Thumbnails From - Thumbnails taken from the middle of your clips can be much more useful than ones from the beginning eg. clips that begin with black etc. |
| MIDI Controls |
|
The MIDI controls window gives access to various options about VJamm MIDI input, and allows you to assign MIDI controllers to the various VJamm controller parameters. It also has a MIDI Input monitor that you can use to look at the MIDI data coming in to VJamm. See the MIDI Page for details. |
| Load Multiple Clips |
|
Select multiple clips in the file�open dialogue (use shift + click etc.) then press done to load them all into VJamm at once. |
| Sync Mode |
|
Sync mode is designed for the simultaneous playback of multiple clips that have been prepared to be loops of the same lengths, or multiples of the same length. Clips loaded in Sync Mode are started silently & invisibly in time with each other when they are loaded or when the Sync button is pressed. When clips are triggered via PC keys or MIDI, they toggle mute / unmute so that an AV installation can produce a coherent output even if users trigger the system in a completely random fashion, or so an AV synced piece can be performed live. Check the 'Load Clips in Sync Mode' box, then load clips in the normal way to load clips in Sync Mode. Press the Sync button to resync them after pressing Stop etc. Sync Mode was called 'Installation Mode' at first because it was developed for our AV interactive installation 'Gridio' - www.gridio.com |
| Patch Loader |
|
The Patch Loader window gives you double click access to the patches in the current Patch Folder. To set the current patch file location, simply load a VJP in the normal way with the Load button. The patch file directory will then by the directory that that patch is located in. The Auto Patch Loading function cycles through the patches in the current Patch File folder when you press the Start button. The delay before moving on to the next patch is governed by the Interval specified by the user. |
| Recording & Rendering of MIDI Sequences |
|
To use the VJamm Rendering functionality you need to have at least DirectX 8. If you have used the full VJamm Pro Installer to install VJamm 2 Pro on your machine, you will already have rendering installed. If you have installed VJamm manually, please get the rendering components from www.vjammpro.com and put them in the same directory as your VJamm exe To render a VJamm2 composition prepared on an external midi sequencer ...
Rendered audio is all at 44.1Khz, Video at 25fps for now. Supported grafix modes: 16bit, 24bit, 32bit. PAL DV clips must be rendered with the display area in options set to 768x576, otherwise pixel aspect ratio gets messed up & Direct Show can't cope. |
| System Requirements |
|
OS: Win2K and WinXP are supported Normal realtime operation supports most direct X versions For recent versions of VJamm (>2.4) you need OpenGL support on your grafix card. Nearly all recent Grafix cards have excellent OpenGL support, but certain older grafix cards may perform slowly under OpenGL. For old cards you may find the last DirectDraw version - 2.4 - gives you better framerates. Rendering requires at least DirectX 8 & the VJamm Direct Show rendering components to be next to VJamm in the VJamm exe directory. The VJamm Pro installer disk that you receive when you buy VJamm Pro will install the rendering components for you. |

Email: vjpro@camart.co.uk
Web: http://www.vjamm.com
VJamm is produced by Camart.